How to Implement Company Branding Across Office 365

Consistent company branding in Office 365 strengthens your organization’s identity, fosters trust, and enhances professionalism in internal and external communications. By applying your logo, colors, and messaging across tools like SharePoint, Outlook, and Microsoft Teams, you create a unified experience for employees and clients. This guide provides a step-by-step approach to implementing company branding in Office 365, ensuring your corporate identity shines through every interaction.
Why Brand Your Office 365 Environment?
Branding Office 365 applications offers several advantages:
- Professionalism: A cohesive look reinforces your company’s credibility.
- User Trust: Familiar branding reduces phishing risks by making legitimate platforms recognizable.
- Employee Engagement: Branded tools create a sense of unity and pride.
- Customer Experience: External-facing assets (e.g., emails, portals) reflect your brand’s values.
- Efficiency: Centralized branding streamlines content creation and maintenance.
This post is tailored for IT administrators, marketing teams, or HR professionals looking to elevate their Office 365 environment.
Prerequisites
Before starting, ensure you have:
- An Office 365 subscription with access to SharePoint, Outlook, Teams, and Azure Active Directory.
- Global Administrator or SharePoint/Teams Administrator permissions.
- Branding assets (e.g., logo in PNG/JPG, <300KB; background images, 1920x1080 pixels; brand color hex codes).
- Access to the Microsoft 365 admin center.
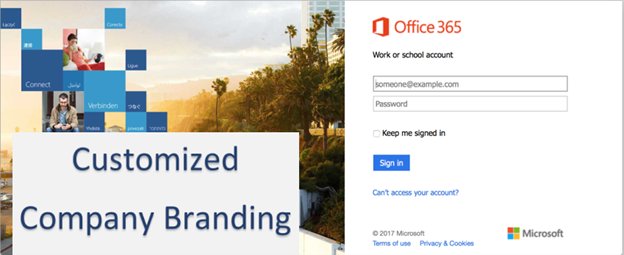
Step 1: Brand the Microsoft 365 Login Page
A branded login page sets the tone for user interactions and enhances security by distinguishing your environment.
- Access Azure Active Directory:
- Log in to the Microsoft 365 admin center (https://admin.microsoft.com).
- Navigate to Admin centers > Azure Active Directory > Company branding.
- Configure Branding:
- Click Configure or Edit (if branding exists).
- Upload assets:
- Banner logo: 280x60 pixels, <10KB, PNG/JPG.
- Square logo: 240x240 pixels, <50KB (for Windows authentication).
- Background image: 1920x1080 pixels, <300KB, PNG/JPG.
- Sign-in page text: Add helpdesk contact or a tagline (e.g., “Welcome to [Company Name]”).
- Set a background color (e.g., #003087 for navy blue).
- Test the Branding:
- Click Save. Open a private browser window (e.g., Chrome Incognito) and visit https://login.microsoftonline.com.
- Verify the logo, background, and text display correctly.
Step 2: Brand SharePoint Online
SharePoint sites are ideal for internal portals, news posts, or client-facing pages.
- Create or Access a Communication Site:
- In the SharePoint admin center, go to Sites > Active sites > Create > Communication site.
- Name the site (e.g., “Company Hub”) and set permissions.
- Customize the Theme:
- On the site, click the Gear icon > Change the look > Theme.
- Create a custom theme:
- Go to SharePoint admin center > Settings > Custom themes.
- Define primary colors (e.g., #003087) and fonts matching your brand.
- Apply the theme to the site.
- Add a Logo and Footer:
- In Change the look > Header, upload your logo (200x50 pixels, PNG).
- In Footer, add your company name or links (e.g., Privacy Policy).
- Test the Site:
- Visit the site’s homepage and ensure the logo, colors, and layout align with your brand.
Step 3: Brand Outlook Email Signatures
Standardized email signatures, as you’ve previously explored, ensure consistent branding in communications.
- Create a Signature Template:
- Open Outlook (desktop or web).
- Go to Settings > View all Outlook settings > Mail > Compose and reply.
- Design a signature including:
- Company logo (embedded as an image, <50KB).
- Name, title, and contact details.
- Brand colors (e.g., text in #003087).
- Optional: Social media links or a tagline.
- Deploy Signatures Organization-Wide:
- In the Microsoft 365 admin center, go to Exchange admin center > Mail flow > Rules.
- Create a new rule to append the signature to outgoing emails.
- Use HTML to format the signature (e.g., include logo, colors). Refer to Microsoft Support for HTML templates.
- Test the Signature:
- Send a test email to an external account (e.g., Gmail) to verify the logo and formatting.
Step 4: Brand Microsoft Teams
Teams is a hub for collaboration, and branding enhances the user experience.
- Set a Custom Background:
- In the Teams admin center (https://admin.teams.microsoft.com), go to Meetings > Meeting policies.
- Enable Custom backgrounds and upload a branded image (1920x1080 pixels, <300KB).
- Customize the Teams App:
- In the Microsoft 365 admin center, go to Settings > Org settings > Organization profile.
- Upload a logo for the Teams app launcher (240x240 pixels).
- Create Branded Channels:
- In a team, add a tab with a branded SharePoint page or news post.
- Use consistent colors and logos in channel descriptions.
- Test the Branding:
- Join a Teams meeting to confirm the custom background.
- Check the app launcher and channels for logo consistency.
Step 5: Promote and Maintain Branding
- Pin Branded Assets:
- In the Microsoft 365 admin center, add custom tiles to the App Launcher for branded sites (e.g., SharePoint hub).
- Communicate with Staff:
- Send a branded email (using your Outlook signature) to inform employees about the updated branding, similar to your IT security email strategy.
- Share a guide (like your previous signature guide) via Teams or SharePoint.
- Monitor and Update:
- Regularly check branding assets for relevance (e.g., update logos during rebranding).
- Use feedback from employees or clients to refine visuals.
Best Practices for Office 365 Branding
- Optimize Assets: Use recommended image sizes (e.g., <300KB for backgrounds) to ensure fast loading.
- Stay Consistent: Document your brand guidelines (logo usage, hex codes like #003087, fonts) for all teams.
- Enhance Security: Branded login pages help users identify legitimate platforms, reducing phishing risks (as noted in your IT email focus).
- Test Across Devices: Verify branding on desktop, mobile, and tablet views.
- Leverage Analytics: Use SharePoint or Teams analytics to track engagement with branded content.
Troubleshooting Tips
- Branding Not Visible? Ensure you have an Azure AD P1/P2 license. Clear browser cache or test in Incognito mode.
- Logo Distorted? Check image dimensions (e.g., 280x60 pixels for login banner). Resize using a photo editor.
- Signature Not Applied? Verify the mail flow rule in Exchange admin center and test with a new email.